
Draft: this article is not published. It is not listed on the blog and not indexed.
· By HeyData team
Series: Designing Talend Jobs: Dale Anderson’s best practices, revisited for Studio 8 · article 2 of 7
Structuring a Talend Job: canvas, parent and child Jobs, tPreJob and tPostJob
A Talend Job is read first as a drawing. Before opening a single component, the canvas shows where the data comes from, where it goes and what happens on error. Provided, of course, that the drawing is clear. A forty-component Job laid out in a zig-zag, with crossing links, is hard to understand and even harder to fix. A Job’s structure is therefore the first best practice.
This article summarises and adapts to Talend Studio 8 parts 1 and 3 of “Talend Job Design Patterns and Best Practices” by Dale Anderson (Talend, 2015-2016). His advice remains a reference: we revisit it with today’s tools.
The canvas reads from top to bottom
Dale Anderson suggests a simple rule: build from top to bottom, then from left to right. The normal processing path goes right and down; a path leaving to the left signals an error. Links should not cross.
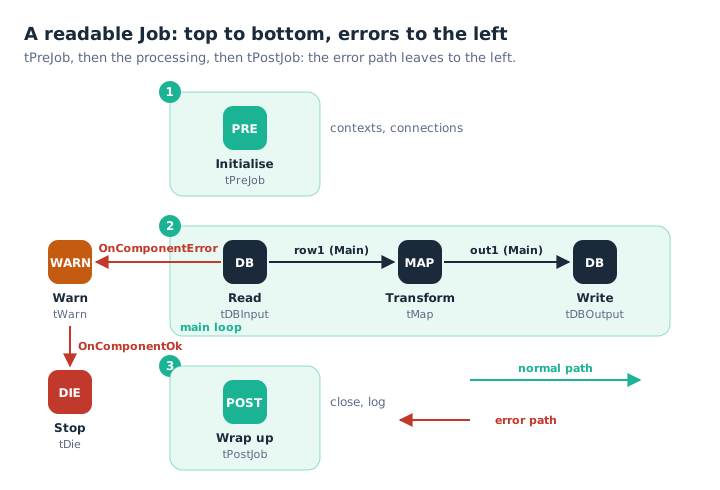
Initialise, process, wrap up: the error stands out at a glance because it leaves to the left.
The author admits the zig-zag layout is tempting, because it is quick to write: components are lined up to the right, then the next one drops back to the left one row down. But if a Job needs several rows to fit on screen, it is often doing too much. In the same vein, he advises spreading out the canvas: tightly packed components are hard to read.
Atomic Jobs, orchestrated by a parent
A big Job is hard to understand, debug and maintain. The solution is to split it into child Jobs that each have a single purpose, called by a parent Job with the tRunJob component. The parent orchestrates, the children do the work. Splitting also helps error handling: the parent decides what happens when a child fails.
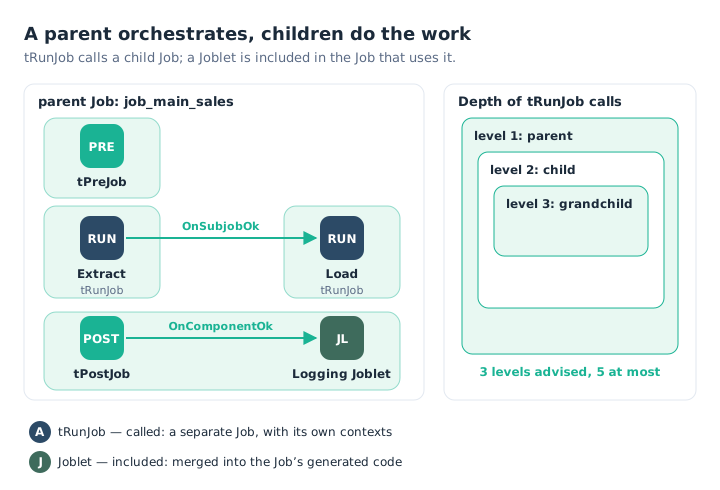
The parent chains the children; the Joblet is part of the Job that uses it.
How far should you split? Dale Anderson sets a landmark: no more than three levels of nested tRunJob calls, five at the very most. Beyond that, memory use, the parameters to pass and debugging become hard to control. The Qlik Talend development life cycle guide adds another landmark: avoid more than twenty components per Job.
Two tRunJob options are worth knowing:
- Transmit whole context passes all of the parent’s contexts to the child Job, which saves passing them one by one;
- Use an independent process to run subjob runs the child in a separate JVM, with its own memory. It is not parallelism as such, but it isolates a memory-hungry child.
tRunJob or Joblet?
The difference fits in two words: a child Job is called, a Joblet is included. The child Job remains a separate Job, run by tRunJob, with its own contexts and its own generated code. The Joblet is a Job fragment that Studio merges into the code of the Job that uses it: it shares that Job’s context and execution.
For Dale Anderson, good use cases for Joblets are few, but valuable when you find them. He distinguishes two forms:
- the classic Joblet receives rows through its input, processes them (updating a table, writing a log) and sends them on through its output;
- the Joblet with no input or output simply acts on its own. The typical example is a
tLogCatcherthat catches the Job’s errors to log them: we detail it in the article on errors.
For a Joblet to serve several projects, store it in a reference project. We come back to this in the article on industrialisation.
Explicit entry and exit points
Every Job starts and ends somewhere. Studio provides two components to mark it:
tPreJobruns before the rest of the Job. It is the initialisation step: load contexts, open connections, write a first log message;tPostJobruns after, even if the Job stopped on atDieor on an error with the Die on error option. It is the wrap-up step: close connections, clean up, log the end.
tPreJob and tPostJob are not linked to the rest of the Job: Studio runs them automatically, at the start and at the end. Only their own components are linked, for example tPreJob to a tDBConnection.
The tWarn and tDie components complete this setup. tWarn sends a warning without interrupting the Job; tDie stops it with a code and a message. Both feed tLogCatcher, which makes them the natural tools for controlled error handling.
Identifying the main loop
In almost every Job, one process does most of the work: the main loop, usually the first data flow whose end marks the end of the Job. Secondary loops may be nested in it, for example an iteration over files. Dale Anderson recommends identifying the main loop explicitly and adding a tWarn and a tDie to the component that drives it. You then control the Job’s exit instead of suffering it.
What has changed since 2016
- Canvas links have been curved since Talend 6. They avoid crossings better, but are no substitute for a clear layout.
- The landmark of twenty components per Job comes from the Qlik Talend development life cycle guide. It complements the three-level rule.
- Child Jobs are now managed with Git, which makes splitting easier to follow: each Job has its own history.
- The Job Script module Dale Anderson described still ships with Talend Studio 8: a Job can be written as text, then generated.
Key takeaways
- Top to bottom, then left to right. The normal path goes right and down, errors leave to the left.
- One Job, one purpose. Split into child Jobs called by a parent.
- Three levels of calls. Five at most, and twenty components per Job as a landmark.
- Called or included.
tRunJobcalls a separate Job; a Joblet is merged into the Job that uses it. - Explicit entry and exit.
tPreJobinitialises,tPostJobwraps up, even after atDie. - The main loop under control. A
tWarnand atDieon the component that drives it.
Try it in Talend Studio
To check that tPostJob runs even after a stop:
- Create a Job
job_demo_child: atPreJoblinked by OnComponentOk to atJavathat printsSystem.out.println("Initialisation");. - Add a
tFixedFlowInputproducing one row, linked to atDie(message “Deliberate stop”, code 4). - Add a
tPostJoblinked to atJavathat printsSystem.out.println("Wrap-up");. - Run the Job: the console shows “Initialisation”, the
tDiestop, then “Wrap-up”. - Create a Job
job_demo_parentcontaining atRunJobthat callsjob_demo_child, with Die on child error cleared. Add atJavalinked by OnSubjobOk that prints the child’s return code:
System.out.println("Child return code: " + globalMap.get("tRunJob_1_CHILD_RETURN_CODE"));The parent ends normally and reads the code 4 returned by the child.
Variant: starting from a Job Script
A Job Script describes a Job as text: components, settings and links. Studio can generate a Job from this text, and produce the text of an existing Job. Here are the recipe’s two Jobs, ready to paste. First job_demo_child:
SCRIPT_VERSION=4.2,
JobType= Standard,
DEFAULT_CONTEXT: DEV,
ContextType { NAME: DEV }
addComponent {
  setComponentDefinition { TYPE: "tPrejob", NAME: "tPrejob_1", POSITION: 64, 64 }
  setSettings { LABEL : "Initialise" }
}
addComponent {
  setComponentDefinition { TYPE: "tJava", NAME: "tJava_1", POSITION: 256, 64 }
  setSettings {
    CODE : "System.out.println(\"Initialisation\");",
    LABEL : "Initialisation"
  }
}
addComponent {
  setComponentDefinition { TYPE: "tFixedFlowInput", NAME: "tFixedFlowInput_1", POSITION: 64, 192 }
  setSettings {
    NB_ROWS : "1",
    USE_SINGLEMODE : "true",
    VALUES { SCHEMA_COLUMN : "message", VALUE : "\"demo\"" },
    LABEL : "One row"
  }
  addSchema {
    NAME: "tFixedFlowInput_1", CONNECTOR: "FLOW"
    addColumn { NAME: "message", TYPE: "id_String", NULLABLE: true }
  }
}
addComponent {
  setComponentDefinition { TYPE: "tDie", NAME: "tDie_1", POSITION: 256, 192 }
  setSettings {
    MESSAGE : "\"Deliberate stop\"",
    CODE : "4",
    EXIT_JVM : "false",
    LABEL : "Deliberate stop"
  }
}
addComponent {
  setComponentDefinition { TYPE: "tPostjob", NAME: "tPostjob_1", POSITION: 64, 320 }
  setSettings { LABEL : "Wrap up" }
}
addComponent {
  setComponentDefinition { TYPE: "tJava", NAME: "tJava_2", POSITION: 256, 320 }
  setSettings {
    CODE : "System.out.println(\"Wrap-up\");",
    LABEL : "Wrap-up"
  }
}
addConnection {
  TYPE: "COMPONENT_OK", NAME: "OnComponentOk", LINESTYLE: 3,
  METANAME: "tPrejob_1", SOURCE: "tPrejob_1", TARGET: "tJava_1"
}
addConnection {
  TYPE: "FLOW", NAME: "row1", LINESTYLE: 0,
  METANAME: "tFixedFlowInput_1", SOURCE: "tFixedFlowInput_1", TARGET: "tDie_1"
}
addConnection {
  TYPE: "COMPONENT_OK", NAME: "OnComponentOk", LINESTYLE: 3,
  METANAME: "tPostjob_1", SOURCE: "tPostjob_1", TARGET: "tJava_2"
}
Then job_demo_parent. Its tRunJob refers to the child by its name, but above all by PROJECT:CHILD_ID: the project’s technical name, in capitals, and the internal identifier Studio gave the child when it was created. Without this identifier, the tRunJob cannot find the Job to run.
SCRIPT_VERSION=4.2,
JobType= Standard,
DEFAULT_CONTEXT: DEV,
ContextType { NAME: DEV }
addComponent {
  setComponentDefinition { TYPE: "tRunJob", NAME: "tRunJob_1", POSITION: 64, 64 }
  setSettings {
    PROCESS : "job_demo_child",
    PROCESS:PROCESS_TYPE_PROCESS : "PROJECT:CHILD_ID",
    PROCESS:PROCESS_TYPE_CONTEXT : "DEV",
    PROCESS:PROCESS_TYPE_VERSION : "Latest",
    DIE_ON_CHILD_ERROR : "false",
    TRANSMIT_WHOLE_CONTEXT : "true",
    LABEL : "Call the child"
  }
}
addComponent {
  setComponentDefinition { TYPE: "tJava", NAME: "tJava_1", POSITION: 64, 192 }
  setSettings {
    CODE : "System.out.println(\"Child return code: \" + globalMap.get(\"tRunJob_1_CHILD_RETURN_CODE\"));",
    LABEL : "Read the return code"
  }
}
addConnection {
  TYPE: "SUBJOB_OK", NAME: "OnSubjobOk", LINESTYLE: 1,
  METANAME: "tRunJob_1", SOURCE: "tRunJob_1", TARGET: "tJava_1"
}
To deploy them, in a test project:
-
In the repository, Code › Job Scripts, right-click Create JobScript; name it
job_demo_child. -
Paste the script into the editor and save (Ctrl+S): syntax errors are underlined.
-
Click Generate Job in the toolbar: the Job appears under Job Designs.
-
Note the child’s identifier. In Studio’s workspace, open
<PROJECT>/process/job_demo_child_0.1.properties: it is theidattribute of the<TalendProperties:Property …>tag, shaped like_aBc123…(notxmi:id). From the command line:grep -o '<TalendProperties:Property [^>]*' job_demo_child_0.1.properties | grep -o ' id="[^"]*"' -
In the parent’s script, replace
PROJECT:CHILD_ID, for example withDEMO:_aBc123…, then create and generatejob_demo_parentlike the child. -
Open the parent, check the called Job and the DEV context in the
tRunJob, then run it. Is the Job field empty? The identifier is wrong: select the child again with the … button. -
If the menu is missing, create an empty Job, open the Jobscript tab of its editor, paste the script and save.
The Job Script syntax has no complete public documentation. To find a setting’s exact name, build the component by hand, then right-click the Job, Export Job Script, and compare. The identifier changes each time the child is created: if you generate it again, generate the parent again too. Finally, a Job Script must never contain a password: connections go through repository metadata and contexts.
Sources
- Dale Anderson, Talend Job Design Patterns and Best Practices, part 1 and part 3, Talend (archived version).
- Qlik Talend help: Software Development Lifecycle Best Practices Guide, designing Jobs and What is a Job design?.
All credit for the original content goes to Dale Anderson; the adaptation to Talend Studio 8 and any errors are HeyData’s. This article is part of our series on Talend Job design best practices: explore the series.